F tamdoll's workspace: tutorial
Showing posts with label tutorial. Show all posts

Quick and Easy Shawl Clasp

January 5, 2025

I haven't used this shawl because it wasn't long enough to stay securely on my shoulders, and I couldn't find a shawl pin that I liked. I had been looking for one that wouldn't poke into my skin every time I moved. So, I searched through my stash for a button with a large shank, and within a few minutes had a way to secure this over my shoulders.

A silver button secured among the stitches of a light blue knitted shawl.

It was easy to do - 

DIY Foam Stamps

September 12, 2019
This project was fun and quick to do.

Being creative doesn't mean you need to go out and buy lots of new craft supplies - you can use things you find around you! Projects don't need to be fancy or complicated to be creative and fun.

At first glance ... I wondered if this one was share-worthy. Is it snazzy enough to share online? Do I need to put up step-by-step directions in this era of "find everything on the internet, there's probably a YouTube video for it"? Does anyone send handmade cards anymore? Does anyone care?


Well, I care. This is what I do, I make stuff, and share it online, so here it is. Experimenting and having fun are part of being creative, and this project was a spur-of-the-moment idea that I tried out with some success. Read on for how I made a simple stamp and created a few base cards that lend themselves to embellishing. It's more personal than a text + bitmoji & I hope it inspires someone to create a card or two.


Drying Herbs

July 3, 2014
The standing, self-watering garden that my sister sent me is fantastic. Not only do I not have to break my neck to plant anything - there's no grubs or critters digging through the soil. This one pictured just has one tomato plant and herbs. So far everything is thriving and necessitated a session of drying herbs way earlier than I usually do in the summertime. (I have the same plants in the ground, too, but they're doing so poorly it would be embarrassing to photograph and include them here. I may never go back to regular gardening after this.)

Tamdoll's Standing Garden @GardenersSupply. I may never go back to regular gardening after this. tamdoll.com

Drying herbs is easy; I just take a few snips, and place them in a cool, dry place in a paper bag until they're crumbly (6 second video formerly on Vine).


Faster Way to Drying Herbs on a Sunny Day


I thought I was being clever until I dug up my old how-to from 2009, which was much simpler & would have been quicker on a sunny day!

Drying Herbs with the Sun. Simply cut, lay out on one layer, cover with a screen and put out until dry. via tamdoll.com


  • Cut herbs and lay out on cooling rack in a sunny spot.

  • Turn a screened window frame over the rack, so delicate herbs don't blow away.

  • Bottle, label and pack them up. (Makes a nice gift!)

So easy, will definitely use this method on the next sunny day.

Drying your own herbs, or have summer gardening tricks to share?

Welcome 2014 with a Snowflake Tutorial

January 6, 2014
I am so excited for the fresh start of 2014, Happy New Year to all!

To kick off the year, I've created a snowflake tutorial. I was inspired to make this particular project thanks to Pam at Gingerbread Snowflakes. Pam always has fresh and inspiring content and her warmth and personality shine through in her blog. She sent me a beautiful handmade holiday card this year and I instantly wanted to create something unique of my own. (I've been neglectful to family and friends - it's been a few years since I sent out any seasonal cards.) Being close to New Year's, I thought of creating one based on the date and a new project was born.

Tamdoll Snowflake Tutorial


Having a community of friends online has meant the world to my creative work - I've been thinking about you for the past few months and there will be some inspired projects coming out this year. I also started a Made with Tamdoll Flickr group for those who, over the years have created projects based on my tutorials or purchased my patterns from Etsy or Ravelry. (I don't know why I didn't think of this sooner - I've been selling my patterns online since '03!)

Tamdoll Snowflake Cutout Tutorial


There is a full Snowflake Cutout Tutorial with more how-to images at https://tamdoll.blogspot.com/p/snowflake-cutout-tutorial.html. As I worked on it, I thought that it could also be appropriate for a milestone birthday or a graduation celebration. I haven't lost sight of creating a New Year's card out of it, but the large square shape leaves me with some more work to do until it's ready to be mailed. Of course, once the wheels started turning, more and more ideas developed - what if I used the snowflake as a stencil, or decided to embroider the pattern, or cut one out of felt and applique it? If I do nothing else this year, I already have ideas to keep me very busy!

But that's not the case. I have many ideas. I've signed up for some online courses. I'm determined to focus this year. There may be only 5 of you reading these posts nowadays, but I'm happy you're still here. Thank you. That New Year's card? Will probably come out next December and I'll have to work on "2015".

Thank you for visiting! And happy 2014!

If at First You Don’t Succeed….

January 31, 2012

… try, try again.

click to see bigger picture -Tamdoll

As soon as I saw the Lorna’s Laces Solemate yarn, I wanted to work with it. There was a lot of appeal: there was the cleverly named color Zombie BBQ; the promised warmth of the insulating technology of the 30% Outlast® fiber content; and of course the endearing way Mr. Tamdoll called it “Soul – é  – matte” when I pointed it out to him in the store… like it was something exotic and foreign.

Let me say now – these are not good reasons to buy 425 yard skeins of sock yarn when you have no intention of making socks.

My first project attempt (1) was a cowl.  A lacy, intricate pattern that after 2 or 3 attempts I decided weren’t worth the effort because you couldn’t see the lace through the color changes of the yarn.  And seriously, it would take a really, really long time to knit all that on size 2 needles.  So after a few days of project seeking & brainstorming… even considering sock making!.. I thought of making the yarn into a cord. 

I pulled out my little cord maker and figured that 425 yards would give me about 100 yards of workable, much thicker yarn.  

Two movies and many, many cranks of the handle later…. I ended up with 29 yards of cord (2). Only 29!!!!  Well, now I felt stuck that I would have to unravel it all, because what the heck do you make with only 29 yards?   Well, you can see from pictures (3) & (4) that I made it work.  For picture (3), I used size 50 needles, cast on 5 & knit away.  It was too loose and ropy looking, so I tried size 35 needles for picture (4).  Casting on 7 stitches worked perfect for it and now I have a roomy cowl to keep me warm. 

I am so, so pleased!  It’s really unique this way, but I’m beginning to wonder with all the thinking, winding, knitting and re-knitting, if working all 425 yards on size 2 needles would have been quicker in the end?  

I think that I came to the cord idea by looking at lots of projects made with chunky yarns, and I had the Embellish-Knit! nearby on my desk.  Somehow my brain put the ideas together & I’m glad it did.  Do you ever come up with ideas and don’t know where they came from?  or use your materials in unexpected ways?

Valentine Papier-mâché Hearts

January 29, 2011

Thanks for the comments on my last post!  I don’t have an exact “how-to”.. but can tell you what I did to decorate the hearts.   I didn’t make the base hearts –they were papier-mâché ones that I had in my stash for many years.   Does anyone else do that?  I save things for a long time, afraid that I’ll ruin them, or never have them again… it’s self-defeating I think. 

I’ve been wanting to collage with sheet music for a while – I always see it done so nicely on other people’s blogs so I pulled out some music I’d been saving – and tore it up, focusing on “romantic” words.  Then I went through my paper stash and took out coordinating papers, a poem from the back of a chocolate bar, along with tissue paper that had been stamped with permanent ink and images that I used in this 2010 decoupage project (I save everything!)

Using matte Gel Medium as glue (had Liquitex Matte Gel left over from that first project, too – it’s really nice and thick), I first pasted on the music-pieces.  Next I pasted accent papers all around, layering them a little, covering the base completely.  I made sure not to get the gel on top of any of the pieces, afraid that it would act as a resist to the paint later on.

Tamdoll click for closeup pictures

In the afternoon when all was dry, I took out paints that I had at home – Golden Fluid Acrylics in Iridescent Gold Deep color, and a pink and burgundy glaze (Plaid brand, Folk Art paints).  I just squirted a dollop onto wax paper and tried to brush on and blend the different colors, but wanted a more transparent look, so started smooshing and rubbing it all on with my fingers.  I ended up finger painting all of them.  It was fun, but my hands took a beating from all the washing. 

Usually I’ll spray a fixative or a sealer when I’m done with a project like this, but I didn’t want to dull the shine from the paint.  I went back once more to darken up some of the first pieces that I hadn’t been so bold with – and that was it!  A half-dozen cute Valentine ornaments that can be used as an indoor decoration this winter.

Do you ever depart from your normal crafts? Have huge stashes of things you never use or are afraid to let go of?  Save everything and then are really happy when you find a use for them?  As I re-read this post, this is what I came away with, sounds a little wacky, but I know I’m not alone out there!

Look for this at the Craft schooling Sunday link party, too – lots of fun!

Craft Schooling Sunday

Artful Thursday – Easy Drawstring Bag Tutorial

December 23, 2010

This is a super easy and quick project… it’s taken me longer to photograph and write up a how-to for this blog post than it did to create this bag.  I whipped up a bunch a few nights ago to wrap some presents in and find it’s a great way to use the mounds of fabric that seem to multiply around here (t-shirts are fabric, too!).  These an eco-friendly way to wrap presents – no paper filling up the recycling bin and they can be washed and reused (how about: a travel bag for shoes;  toy pouch; makeup bag; lingerie bag; storage… how many ideas can you come up with?).

 Tamdoll Drawstring Bag Sewing Tutorial 10

What you’ll need:

  • Knit fabric – it doesn’t unravel or fray at the edges. (t-shirts are great!)
  • Needle, thread, scissors – sewing by machine or hand – for machine sewing you will need a ball-point needle – essential to sew through knits smoothly.
  • Ribbon, cord, shoelace, heavy yarn, etc… for drawstring.
  • Safety pin or bodkin to help thread the drawstring.
  • Embellishments optional – ribbon, embroidery floss, appliqués, fabric paint, etc. – whatever you can think of.

I’m not going to tell you how much fabric you’ll need since I don’t know what you’re wrapping.  How to figure it out?  If you were going to wrap it in paper, that’s about how much fabric you’ll need– you will need some of the overlap for your seams and the drawstring part – so it’s an easy estimate to just lay your item on your fabric and cut away,  no rulers necessary.  Same goes for cording and embellishments – they all go according to the size of the bag you’re making.

How To:

Cut out fabric:Tamdoll Drawstring Bag Sewing Tutorial 1

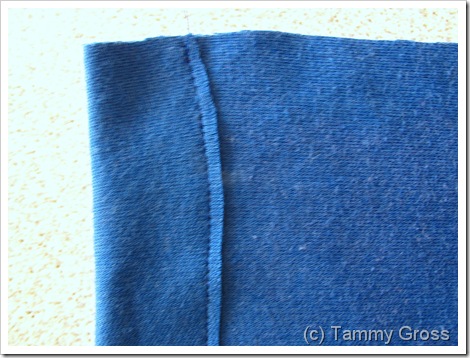
Create drawstring casing - fold over one long edge so that your drawstring will fit inside and stitch close to the edge:Tamdoll Drawstring Bag Sewing Tutorial 2 I went back and did another row next to that line of stitching to make it extra-sturdy.

Turn to the right-side and embellish your bag:Tamdoll Drawstring Bag Sewing Tutorial 3 Here I used ribbon** from my etsy shop.

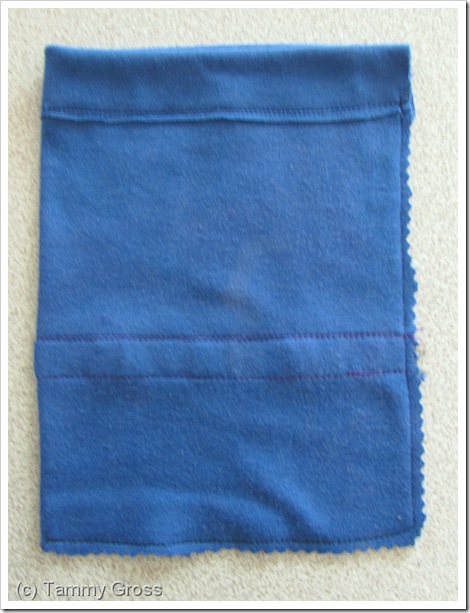
Now fold, right-sides together and stitch around three sides – starting just below your casing:Tamdoll Drawstring Bag Sewing Tutorial 4 I trimmed all edges with pinking sheers when I was done.

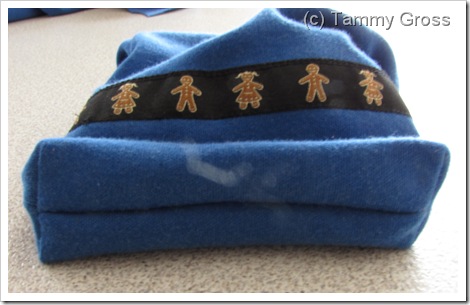
If you like, you can fold up the bottom edge and sew across the two corner triangles that are formed.  This will create a cute flat bottom for your bag.  You can make very large triangles, too, if you want to make a wider bottom for your bag (it all depends on what the bag is for.) Bottom inside-out view:Tamdoll Drawstring Bag Sewing Tutorial 5 Next, you can trim off those pieces on the corner so they’re not lumpy in your bag:Tamdoll Drawstring Bag Sewing Tutorial 6

Turn right-side out:Tamdoll Drawstring Bag Sewing Tutorial 7 Sorry about the smudge mid-picture… I thought I was getting sun-glare.  Turned out I just needed to clean the lens of my camera.  Must have been from yesterday’s snowy pictures – guess I wasn’t as careful as I thought I was protecting it from wetness.

Almost done!Tamdoll Drawstring Bag Sewing Tutorial 8

One more thing is to thread the cording.  In the past I’ve used a safety pin or a pair of hemostats, but I picked up this “Elastic Pull-Thru” by Dyno at an antique store and it’s been super-handy.  I found something similar online:Tamdoll Drawstring Bag Sewing Tutorial 9

Threaded, knotted, gift added, cinched and now it’s ready to go:Tamdoll Drawstring Bag Sewing Tutorial 10

Let me know if you make any of these, and add a link in the comments to share.

Happy Artful Thursday! 

**I’m kind of tired of selling ribbons in my shop – if anyone wants all the yardage that I have left (it’s not all listed)– make me an offer, please!

Artful Thursdays – Crochet Hook Roll - Sewing Tutorial

September 16, 2010

Artful Thursdays are back!  I have a super-quick project to share, made this in under an hour this morning – even with interruptions – it’s a great useful project and would make a nice gift, too.

What to do with all these?Tamdoll's hooks

Make a case!  Somehow I’ve misplaced and re-purchased my size G hook three or four times.  It’s a good thing I have a daughter who crochets now and needs somewhere to store her own hooks (and all my doubles!). 

The first piece of fabric I grabbed out of my scrap basket happened to be the edge of a sheet – brilliant!  No hemming needed!  A pillowcase edge would work for this, too.  Of course, you can add an allowance for hem to all these directions, iron and stitch them in place, too.

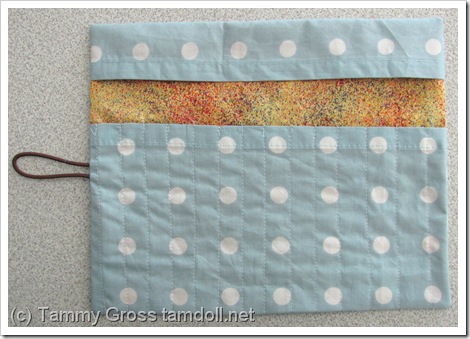
The fabrics:(c) Tammy Gross tamdoll.netI like the light-weight cotton fabrics best for this project without any interfacing or batting necessary.  Your completed project will roll up better this way.


Directions:

Cut 2 fabrics 10” x 7.5” – one of the outside fabric and one of a contrasting  lining fabric.(c) Tammy Gross tamdoll.net

Cut two more pieces 10” wide, making sure the hemmed edges are on the 10” edge.  One will be 1.75” high and the other, 4.5” high.  (Remember, if you need to add your own hems to these pieces, cut them about 1.5” taller, fold, press, fold, press & hem.)(c) Tammy Gross tamdoll.net

Working with all the fabrics right-side up, lay the 4.5” piece on your lining fabric along the bottom of one long edge.  Now you’ll stitch vertical lines over this piece.(c) Tammy Gross tamdoll.net

Close-up of stitching vertical lines below.  I usually use my presser-foot as a guide, but most are about 1/2” or a little more apart.  It’s easy to just lift and turn the foot at the end of each row and make your way back up again in the other direction.  If you have thicker hooks or those with cushioned handles – be sure to make wider rows.(c) Tammy Gross tamdoll.net

Clip loose threads and lay a hair elastic along one side, tacking it down with a few stitches.  Next, lay the 1.75” piece, right-side up, across the top edge of your lining fabric.  Hair elastics are great for these projects, very sturdy!  (In the picture my elastic appears in the middle of the fabric – I think it works better if it’s more toward the top third of the piece.)(c) Tammy Gross tamdoll.net


Turn your outside fabric piece over and pin it to the layered pieces, all right-sides together.(c) Tammy Gross tamdoll.net

Stitch it around all edges, leaving an opening along one side.  I use a 3/8” seam allowance.(c) Tammy Gross tamdoll.net
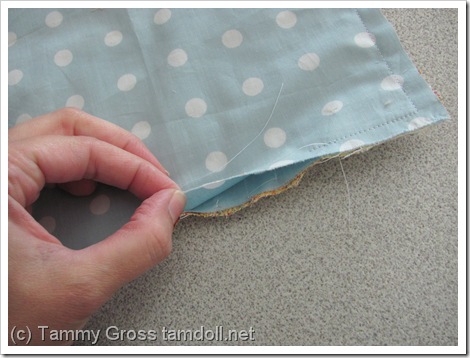
Next, trim around the piece, making sure to clip diagonally along the corners.  I have pinking shears, but they’re not necessary. (c) Tammy Gross tamdoll.net

Poke out corners with a round-tipped stick.(c) Tammy Gross tamdoll.net

Once your piece is turned right-side out, give it a quick press with your iron and stitch closely around the edges, making sure to capture the opening and stitch it closed. (c) Tammy Gross tamdoll.net

It’s done!(c) Tammy Gross tamdoll.net

  Ready to be a home for crochet hooks.(c) Tammy Gross tamdoll.net

Rolls up easily for storage. (c) Tammy Gross tamdoll.net 

My case is almost all filled up.(c) Tammy Gross tamdoll.net

Mother-daughter crochet hook cases, complete!(c) Tammy Gross tamdoll.net

Have a happy Thursday!  Stop by and visit all the other crafty folks participating in the Artful Thursday project, too:

Artful Thursdays

Artful Thursday – Stamped Wall Hanging Tutorial

June 17, 2010

I’ve had this “Commandments” stamp for a while, and it’s always given me trouble when I use it on paper, so I thought I’d try fabric today. I had fabric remnants from curtain lining created years ago so thought this would be a great canvas to make a wall-art present for an upcoming Bat Mitzvah.

The image on the left was created when I placed the stamp face-down on the fabric in the “traditional” stamping method. The image on the right was created when I lay the fabric over the inked stamp and used a brayer to roll over the top.

Tamdoll stamping on fabric

Careful! Don’t let the fabric slip around.

Tamdoll Inking with Brayer

Next, I cut out squares of cotton quilt-batting for the backs:

Small pieces of cotton batting

I layered the quilt batting and another piece of white fabric behind each piece, then using the free-motion foot on my sewing machine and metallic thread, I outlined some of the images that I stamped.

Free Motion Quilting Metallic Threads

I kept going back, adding more details, then beads to make the image pop. I'm enjoying the mixed-media approach to art, I can incorporate all the things I love to do!

Completed Bat Mitzvah Mixed Media

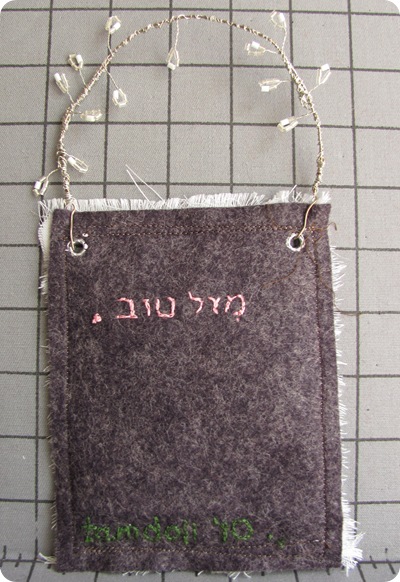
After I was satisfied with all the beads and quilting, I sewed a piece of sturdy wool felt to the back of the piece and added grommets to hold a hanger. Taking a tip from one of Paper Bird’s Artful Thursday tutorials, I used wire and beads to create a hanger.

Mazel Tov

On the back I embroidered the Hebrew words “Mazel Tov” - which translates to Good Luck, and is used as a “Congratulations”. I was glad to make this for a friend’s daughter and I hope she enjoys this unique piece!

Happy Artful Thursday.

Artful   Thursdays

Artful Thursday #16 – Mother’s Day Banner Bunting Tutorial

April 29, 2010
Wow, I hadn’t realized I’ve had 15 posts until now.. Artful Thursdays have been an inspiration for me to de-stash and be extra creative each week; thanks again go to Julie Collings for this fantastic idea.
Tamdoll's Mother's Day Bunting
This is a quick project that I thought would look great hanging on a window or across a door for Mother’s Day. I started off with two equal sized pieces of fabric. These happened to be about 11” x 18” :
Tamdoll's Mother's Day Bunting
I folded the fabric in half and, on a piece of paper, measured & cut out a triangle that would fit in the space. It was easy to use this as a template to cut out as many as would fit from the fabric:
Tamdoll's Mother's Day Bunting
Sewing with right-sides together, I quickly seamed up the two long sides of each triangle:
Tamdoll's Mother's Day Bunting
I turned each triangle right-side out through the top and pressed flat with a hot iron:
Tamdoll's Mother's Day Bunting
Next, I returned to my paper triangle template and drew out the letters I wanted. I used the triangle as a guide for how big to make the letters. (You can also print out text or trace letters from a book or stencil.) Once I cut out the letters from the paper, I was able to trace them onto the right-side of some fabric that I had prepared with paper-backed fusible webbing. You could also iron on freezer paper to add some stability to the fabric letters, or use pre-purchased felt ones. Next, I ironed-on and sewed around each letter to secure it and add details. My original plan was to do this stitching by hand and use embroidery floss but I wanted to keep this a quick project:
Tamdoll's Mother's Day Bunting
Lining the triangles up, I pinned them between the folds of a scrap of quilt binding from my stash and quickly sewed it all together.
Tamdoll's Mother's Day Bunting
I felt they needed a little more punch of white, so I added the crochet flower & now they’re ready to be hung for Mother’s Day!
over the kitchen sink
Look for this at the Craft schooling Sunday link party, too – lots of fun!
Happy Artful Thursday.
Artful  Thursdays
I’ve never done any Mother’s Day decorating before, what about you? If you’ll be making one of these, be sure to add a link to your pictures and share!
Powered by Blogger.
Back to Top