F tamdoll's workspace: paper
Showing posts with label paper. Show all posts

DIY Foam Stamps

September 12, 2019
This project was fun and quick to do.

Being creative doesn't mean you need to go out and buy lots of new craft supplies - you can use things you find around you! Projects don't need to be fancy or complicated to be creative and fun.

At first glance ... I wondered if this one was share-worthy. Is it snazzy enough to share online? Do I need to put up step-by-step directions in this era of "find everything on the internet, there's probably a YouTube video for it"? Does anyone send handmade cards anymore? Does anyone care?


Well, I care. This is what I do, I make stuff, and share it online, so here it is. Experimenting and having fun are part of being creative, and this project was a spur-of-the-moment idea that I tried out with some success. Read on for how I made a simple stamp and created a few base cards that lend themselves to embellishing. It's more personal than a text + bitmoji & I hope it inspires someone to create a card or two.


Recycled Paper Card Wallets DIY

March 24, 2016
Next week I'm going on a trip, cross-country to Washington state for Artfest Rising. Really excited, and slightly nervous at the same time... (have never done anything like this before) will post pictures online during the event when I can (probably Instagram or Facebook).

Wanted to bring something to swap, so I made these recycled paper card wallets. Since I'm passionate about recycling, I rescued an old atlas of Massachusetts as a craft supply. How-to comes from Monica at www.artfulrecrafter.com. I cut my pages 9.5 x 10" to make sure the finished wallets fit the MOO cards I just got.
tamdoll recycled paper card wallets diy
These are super easy to turn into mini journals, simply stitching papers into the fold is all it takes. Of course, the covers themselves can also be altered and embellished - I think these will be cute to share and people can have fun with them.
recycled paper card wallet as mini journal DIY
It was nice one day, so I was able to go outside and take pictures:
recycled paper card wallets DIY

Recycled Paper Card Wallets DIY

I have many reasons to be happy with these: they were easy to make, will be light to pack in my luggage, I creatively reused materials, and made something useful.

Have you ever been on an art retreat? Brought along swaps or trades?

Papercraft Folded Booklets

May 17, 2015
I was instantly enamored with the little folded booklets I saw in this April blog post at CappuccinoAndArtJournal. Blogger Pamela was kind enough to get the message to her friend Monica, "the Artful ReCrafter" about the project and a tutorial was born (10/18 update: blog seems to be offline, broken link removed). Thank you ladies, I appreciate this so much!

Creating a small collage journal


I added an extra fold to the first one I made, and used paper scraps to collage on every page. This one is in the spirit of the Artstronauts club, and I'll be adding pen and marker details to them in the future. It's pretty small - a business card can fit in the folded pockets.

papercraft folded booklets by tamdoll

Large Folded Booklet


This next one was created by taping together two pages of an old atlas. The pockets are big enough to hold 4 x 6" photos & I'll be sending it out to family that I recently visited in PA. I hope my nephews notice the map features of their home state.

papercraft folded booklets by tamdoll

Paper-crafting lends itself well to recycling projects - for example, the atlas was on its way to the recycling bin before I rescued it to use; and the small collage booklet was created with a map that came with my rental car while on vacation.

Thanks to the sharing, community spirit of the internet, this is another clever project that can have many uses. The next one that I'll make will have paper signatures sewn into the valley folds of the booklets, to create a journal with built-in pockets.

Have you done any recycled crafts lately? Any paper-crafting projects?

Products Used:

  • 'Books by Hand' Bone Folder
  • EK Success Cutter Bee Precision-Cut Scissors

Reduce, Reuse, Recycle ATC Swap

October 17, 2014
Sometimes too much of a good thing, is just... too much. (Rainbows of colors to choose from, varieties of mediums, unlimited ideas and possibilities - it can be overwhelming!) Having limits and guidelines to creativity can often funnel thoughts into inspiration. When infinite possibilities stall the beginnings of a project, a limited focus can make a path more clear.

As soon as I saw the title for the ATC (Artist Trading Card) Swap going on at Willowing & Friends, I knew I wanted to participate - Reduce, Reuse, Recycle. I had no idea what I was going to do, but I loved the earth-friendly topic & wanted to jump right in.

blank cards for Reduce, Reuse, Recycle ATC Swap

Of course, when I sat down to create, I froze, not knowing what I was going to do next. Looking around at the mess on my desk, I saw an abundance of recyclable items -  pieces of paper and scraps just lying around, waiting to be re-purposed.

Reduce, Reuse, Recycle

beginning ATC cards for Reduce, Reuse, Recycle Swap


By focusing on the theme of Reduce, Reuse, Recycle, I became determined to only use what I had on my desktop to complete the cards for the swap.
Desktop Recycling ATC cards for Reduce, Reuse, Recycle Swap

The images on the cards grew from pencil shavings, the lids of paint jars, gesso, and markers.
recycling in action for ATC Swap of Reduce, Reuse, Recycle
In the end, I completed two of these & sent them off to my partner -

completed ATCs for Reduce, Reuse, Recycle Swap with Tamdoll

I also decided to scan & upload these images to a new Society6 shop, where they're available as prints, cards, phone covers and device skins. I named them after the idea I kept having while creating - "There is Beauty in Everything" & "Find the Beauty in Every Thing".

I think these sat on my desk for too long after completion, because I went on to make a little booklet to hold them, using pieces of: cardboard, a thank you card, and a subway map for the insides; then covering it all with painted paper towels. Yes, this was all on my desk, I did say it was a mess, didn't I?

Tamdoll booklet Reduce, Reuse, Recycle ATC Swap

Thanks to gomakesomething.com for the booklet how-to.

Of course, this was a swap & I got the most lovely package from my partner Gracie! I love those cards & have placed them on a shelf next to my desk. The extras she sent will definitely find their way into a future project, too.

Reduce, Reuse, Recycle ATC Swap from Gracie Howle

This was fun & a good exercise for me. My personal goal for the year has been "focus" and I think this fits as a good reminder that narrowing focus can help to get things done. There was another limiting factor to this project - the time-frame. Having a commitment to my swap partner ensured that I'd finish this and send it out in the mail on time.

How do you get your projects started and finished in a timely manner?

*Disclaimer: The Society6 link provided is an affiliate link, I will be compensated if you make a purchase from society6.com/tamdoll. Thanks for your support!

Recycle Art to Create Cards

May 19, 2014
Finding the time to make handmade cards isn't always easy, but it's worth the extra effort when there's a special occasion. Here, I'll share how I've recently begun to recycle art from other projects to create something new; speeding up the creation of cards from idea inspiration to final card. Why always reinvent the wheel? If there's an element of another project you like and don't want to recreate from scratch, reuse it!

Original creation done in Life Book 2014 class with Marieke Blokland:

Recycle art original piece by Tamdoll

To Recycle the Art:

  • scan the original;

  • edit in your favorite software;

  • print onto heavy weight paper;

  • spray with Krylon Workable Fixatif to prevent smudging;

  • cut out the elements to be reused and glue them to a card; then

  • embellish, edit, personalize... the possibilities are endless!

I scanned my picture at the library and did the extra edit & printing steps at home. There's a reason I didn't simply copy/print at one time: by cropping & scaling only parts of the images to fit onto a 1/4 page card size, then copy and paste, I was able to get 3 repeats of the images onto a single paper. With a bunch of these base cards ready, it's easy to personalize and have fun with individual ones when an occasion for a handmade card arises.

Finished card:

Recycle art with Tamdoll


These two Sugar Sweet Sisters are getting a workout this year in my handmade birthday cards, I haven't tired of reusing them yet. Do you ever Recycle Art in projects? Please share.

Recycle Art Animated .gif

Welcome 2014 with a Snowflake Tutorial

January 6, 2014
I am so excited for the fresh start of 2014, Happy New Year to all!

To kick off the year, I've created a snowflake tutorial. I was inspired to make this particular project thanks to Pam at Gingerbread Snowflakes. Pam always has fresh and inspiring content and her warmth and personality shine through in her blog. She sent me a beautiful handmade holiday card this year and I instantly wanted to create something unique of my own. (I've been neglectful to family and friends - it's been a few years since I sent out any seasonal cards.) Being close to New Year's, I thought of creating one based on the date and a new project was born.

Tamdoll Snowflake Tutorial


Having a community of friends online has meant the world to my creative work - I've been thinking about you for the past few months and there will be some inspired projects coming out this year. I also started a Made with Tamdoll Flickr group for those who, over the years have created projects based on my tutorials or purchased my patterns from Etsy or Ravelry. (I don't know why I didn't think of this sooner - I've been selling my patterns online since '03!)

Tamdoll Snowflake Cutout Tutorial


There is a full Snowflake Cutout Tutorial with more how-to images at https://tamdoll.blogspot.com/p/snowflake-cutout-tutorial.html. As I worked on it, I thought that it could also be appropriate for a milestone birthday or a graduation celebration. I haven't lost sight of creating a New Year's card out of it, but the large square shape leaves me with some more work to do until it's ready to be mailed. Of course, once the wheels started turning, more and more ideas developed - what if I used the snowflake as a stencil, or decided to embroider the pattern, or cut one out of felt and applique it? If I do nothing else this year, I already have ideas to keep me very busy!

But that's not the case. I have many ideas. I've signed up for some online courses. I'm determined to focus this year. There may be only 5 of you reading these posts nowadays, but I'm happy you're still here. Thank you. That New Year's card? Will probably come out next December and I'll have to work on "2015".

Thank you for visiting! And happy 2014!

Tamdoll Paints, Crochets, Knits, Shares, Sells

April 30, 2011

Just wrapping up April since I haven’t posted much in the last week!  Been busy, crafting and taking pictures, but not sitting still long enough to blog about them. 

Tamdoll's Workspace

 Tamdoll PaintsBits of t-shirt fabric (recycling unusable clothes for this project).  First step – I’m painting these, then will layer, stitch and bead to make some new cuff bracelets for my etsy shop.  Look familiar?  I’m taking the idea from the skirt I made previously from the pattern in the Alabama Stitch Book.

Tamdoll's Workspace

Tamdoll Crochets Crochet, baby Hip Dress project in-progress (a gift… there are no more babies in my house!).  This is the one I carry in my handbag for on-the-go crafting.

Tamdoll's Workspace

Tamdoll KnitsI’ve been crocheting so much lately that I think my knitting has gone wonky.  I’m starting to knit myself a short-sleeve sweater, the Arm Candy pattern ... and my gauge has been consistently off no matter what I do.  I’m going to knit a size smaller and measure as I go… I hope this works! Tamdoll's Workspace

 All Free Holiday CraftsMy Mother’s Day Banner Bunting Tutorial has a link at this new website, AllFreeHolidayCrafts.com – it’s pretty nice, if you check it out, let me know what you think.

Tamdoll's Workspace

 tamdoll2001 for sale on eBay I have an odd bunch of things up for sale on eBay right now – tamdoll2001 is my ID.  There’s: a dress from the 80’s; Archie comics, 6-unopened, from the marriage series; Yogi Bear child’s bracelets from the 1970’s; and a stamp collecting book from the 1930’s – a collector may want that one, but also a collage artist would probably love it for the great graphics.  Once in a while I shop on eBay – and every so often I clean out my closets and sell things there, too.  Have you ever?  I noticed that fees have gone up, not sure what that means for me just yet – if it will affect whether I do business there in the future.  The auctions I have listed will close Sunday, May 8, 2011.

 Tamdoll's Workspace

What have you been up to lately? 

Valentine Papier-mâché Hearts

January 29, 2011

Thanks for the comments on my last post!  I don’t have an exact “how-to”.. but can tell you what I did to decorate the hearts.   I didn’t make the base hearts –they were papier-mâché ones that I had in my stash for many years.   Does anyone else do that?  I save things for a long time, afraid that I’ll ruin them, or never have them again… it’s self-defeating I think. 

I’ve been wanting to collage with sheet music for a while – I always see it done so nicely on other people’s blogs so I pulled out some music I’d been saving – and tore it up, focusing on “romantic” words.  Then I went through my paper stash and took out coordinating papers, a poem from the back of a chocolate bar, along with tissue paper that had been stamped with permanent ink and images that I used in this 2010 decoupage project (I save everything!)

Using matte Gel Medium as glue (had Liquitex Matte Gel left over from that first project, too – it’s really nice and thick), I first pasted on the music-pieces.  Next I pasted accent papers all around, layering them a little, covering the base completely.  I made sure not to get the gel on top of any of the pieces, afraid that it would act as a resist to the paint later on.

Tamdoll click for closeup pictures

In the afternoon when all was dry, I took out paints that I had at home – Golden Fluid Acrylics in Iridescent Gold Deep color, and a pink and burgundy glaze (Plaid brand, Folk Art paints).  I just squirted a dollop onto wax paper and tried to brush on and blend the different colors, but wanted a more transparent look, so started smooshing and rubbing it all on with my fingers.  I ended up finger painting all of them.  It was fun, but my hands took a beating from all the washing. 

Usually I’ll spray a fixative or a sealer when I’m done with a project like this, but I didn’t want to dull the shine from the paint.  I went back once more to darken up some of the first pieces that I hadn’t been so bold with – and that was it!  A half-dozen cute Valentine ornaments that can be used as an indoor decoration this winter.

Do you ever depart from your normal crafts? Have huge stashes of things you never use or are afraid to let go of?  Save everything and then are really happy when you find a use for them?  As I re-read this post, this is what I came away with, sounds a little wacky, but I know I’m not alone out there!

Look for this at the Craft schooling Sunday link party, too – lots of fun!

Craft Schooling Sunday

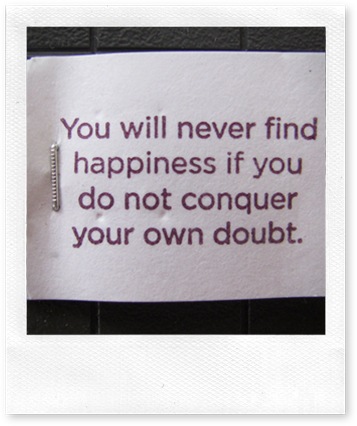
Tea Bag Wisdom

November 10, 2010

I’ll have to keep this in mind.

Clearer than reading tea leaves.

Artful Thursday – DIY Candy Bar Card for Halloween

October 28, 2010

When I saw this adorable Candy Bar Card project*, I knew I had to make one.

Of course I had Halloween paper in my stash:Tamdoll's Halloween Paper Stash I also still had my package of glues and scissors from the Elmer's® Crafters' Campaign (being a BzzAgent, I occasionally participate in different campaigns and share my opinion about products that I receive). This project was really quick and easy once I joined Paper Craft Planet and printed out the templates. 

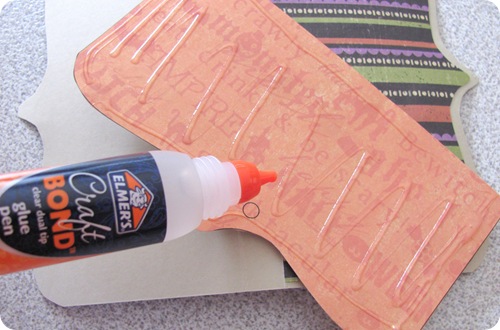
Once I cut out the templates it was really easy to glue things together:Tamdoll gluing My adhesive stash will NEVER again be without this glue pen.  Never. I loved it.  I am usually so messy, putting glue on projects with my fingertips.  That fine tip was perfect.  (And yeah, I have an adhesive “stash”.  A whole drawer of different glues for different materials… doesn’t everyone?)
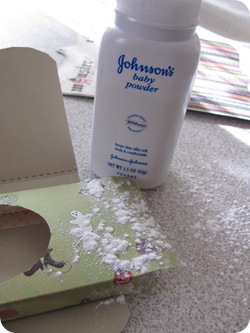
Next, back to the handy tape runner for skinny spots that I wanted to stick instantly and not have to hold-in-place… but I got a little carried away and glued the opening closed!  So, here’s a tip: baby/talcum powder will coat the sticky stuff and make it ineffective:Tamdoll unsticks the glueWhew.  Thank goodness for that.  There’s a reason a trial-sized powder is always at my desk.
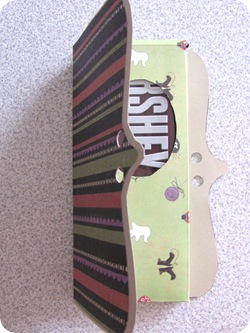
Insert candy bar:Tamdoll's card in progressIt’s almost funny how no one in this house really notices the projects I’m working on until a chocolate bar appears on my table.  Everybody wanted to know what it’s for – I had to finish this project quickly!
I thought the card could use a little more embellishing – so pulled out the X-Acto® scissors and Corner Round Punch from the BzzAgent campaign kit, and stamped some Halloween images on scraps of paper:Tamdoll's tools

I will admit that decorative scissors, in general, are not one of my favorite tools to use.  I’ve had many, many brands of these and am never thrilled with how bulky they feel in my hands, so I usually avoid them.  These did a good job cutting, sharp and accurate.  The corner rounder gave a nice cute finish and worked fantastic – best part, no jagged edges where corner meets edge.  If you’ve used a corner punch before, you know what I’m talking about.  If you haven’t – what I’m saying is: This did a good job.  A few dabs of ink and:Tamdoll Embellishes

Stuck these embellishments on with Glue Spots that came with the Elmer's® package to raise them up & give them some added dimension.  Mysteriously, after some school projects this week, I only have three left – I guess the kids found them handy and put them to good use for their crafts, too.  Added a ribbon tie and that’s it!

Tamdoll's Halloween Candy Bar Cards

*Template, design & project © Leigh Ann Baird.

Happy Artful Thursday! Artful Thursdays

Do you do anything crafty for Halloween? 

I loved reading Jane P’s comment about the Hungry Ghosts Festival, it’s really interesting to learn about different customs.  Thanks for stopping by!

Cute Candy

August 18, 2010

Cute Candy

Artful Thursday – Quick Collage Project

June 3, 2010

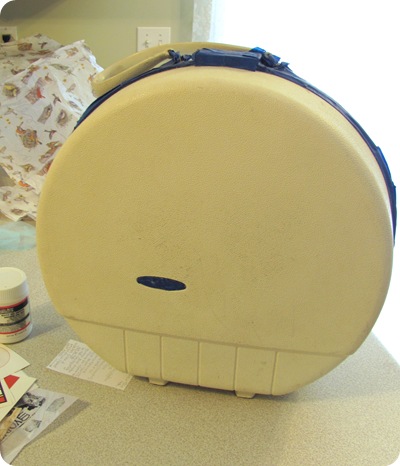
It’s a good thing I have storage space in my house, because this is a big project that I had set aside years ago. I found this round suitcase at a yard sale and couldn’t pass it up:

round suitcase makeover 1

In hindsight, I guess I should have spray painted it a bright color and been finished already, but as I recall, I had these stickers and was doing paper crafting demonstrations at a shop, so I was in this collage frenzy at the time. Needless to say, I recall that the above picture took me hours upon hours to assemble, no wonder I put it in storage and never completed it! After uncovering it in my basement, I discovered an entire side needing some artful help:

round suitcase makeover 2

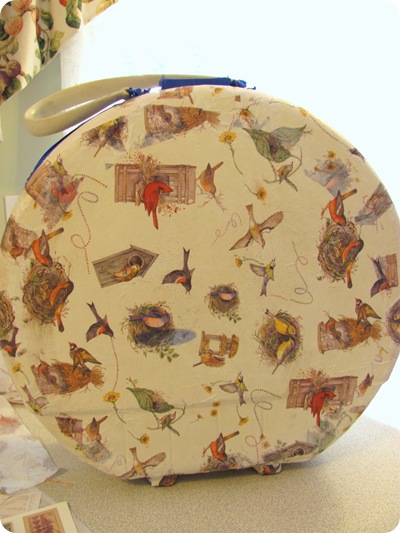
The sheets of bird tissue paper I mentioned in yesterday’s post came in handy… and in no time at all I had side two finished! I used matte gel medium, spread all over the back of the paper with a used gift card (easier to wash and to cover bigger areas with than using a paint brush). One sheet was cut in strips to cover the edges, and a big circle made quick work of the center:

round suitcase makeover 3

After I took this photo, I cut out around the blue taped logo on the center and rubbed some gold translucent paint all over the other side. I don’t even remember what color the hardware is under all that blue tape… probably silver. As a matter of fact, I don’t even know what kind of shape the inside is in. This weekend I should get a chance to spray paint the handle and add a gloss varnish the case a couple of times – next week I should have completed pictures up and I’ll be ready to use this cutie!

My kids introduced me to a show last week, "I Get That A Lot" - and "Decoupage” (or découpage) keeps ringing in my ears since seeing this:

Happy Artful Thursday!

Artful   Thursdays

To me this is an “old school” project. Do you ever revisit projects that you’ve put away for a long time?

Tool Tuesday - What Do You Awl Do About Knots?

April 27, 2010
First question – do I let Stuart keep naming these posts? Do either of us have southern accents?  Does anyone think this is funny??
More seriously, I’m glad he wrote this one.  For years I’ve been using an ice-pick (a nice worn one that I got at an antique store for a buck) and calling it my awl.  I use it to poke holes in things (if you follow my crafting, you know it truly is that random.)  Maybe I need to upgrade to something more ergonomic, with a cute bulb handle.

Disclaimer - links below are affiliate links and I may be compensated if times are purchased when you click through. Thanks for your support.
Tamdoll's red tool box

Since our first Tuesday Tool post, there have been quite a few comments about awls. An awl is useful in many ways, but it is almost essential for working with thread.
In addition to loosening knots in thread and rope, awls can also be used to help set up complex decorative knots and for thread work. For either of these applications, it is important to have a strong and sharp awl since a blunt or bent tip can easily snag and damage delicate thread and cordage.
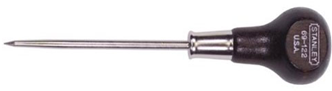
Scratch Awl
What to look for:
Aside from the crafting or sewing awls that you may be familiar with, there are two basic types of awls - a scratch awl as shown above with a small bulbous handle, and a heavier duty steel awl that resembles an ice pick.
Scratch awls are designed for laying out marks in various types of materials. This means that their strong tips can handle the side loads encountered when working with heavier materials, such as leather cord. However, this also means that some awls are going to be thicker than others or with a shorter taper (such as in the one above), making them less for crafting.
You should have good luck finding a simple awl as shown above for about $4-7 at most home improvement stores.
ToolGuyd

In additional to awls, what other types of tools do you use when working with thread, yarn, and cord?

Powered by Blogger.
Back to Top