
I didn’t take notes when I made the bag… so some details will have to be up to the creator...
I started the tote with 5 or 6 skeins of Wool of the Andes yarn from Knitpicks (very economical). Using round needles two sizes too big, I CO about 80-100 stitches with dark blue (a multiple of 10). The bag is knit as if making a giant hat. Double-pointed needles are necessary for the bottom of the bag. You can use a stitch marker to tell when you’re at the next row or just eyeball it using the tail of your cast-on thread or the change in colors from previous rows (a little bit of colored thread tied in a loop makes a handy stitch-marker, too).
Pattern:
Join yarn and knit all rows -
Solid dark blue, 3 rows
For each block of stripes, carry and twist the threads from row to row inside the bag as you work them. Cut and weave in tails at the end of each block, or continue to carry the threads along inside the bag. If you cut, try to weave in ends as you knit – by twisting them around the working yarn, you can carry them along the inside of the bag as you work for a few inches. Then you won’t have to do it at the end of the project. (Felting will ensure they all stay put).
Alternating light and dark blue for 10 rows
In blocks of 5 rows each: alternate between blue & green and pink & orange, twice.
Solid dark blue, 4 rows
In blocks of 5 rows each: alternate between green & blue and orange & pink, twice.
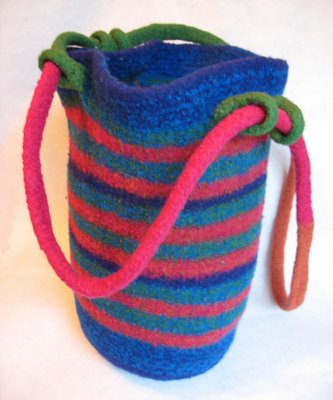
Repeat the last two steps again (see the photo for stripe details).
At the bottom, alternate between light and dark blue rows for another 10 rows.
Decreasing the bottom requires a marker – place it at the beginning of your row:
Since the CO was a multiple of 10, *k8, k2tog* across the row for the first decrease. Knit a row.
Next decrease row: *k7, k2tog*. Knit a row.
Next decrease row: *k6, k2tog*…..
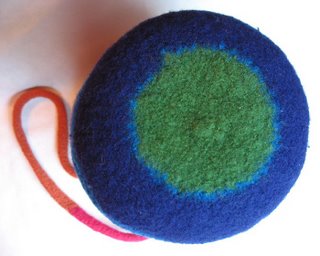
Alternate decrease rows & knit rows to make a flat bottom – each decrease row will have one less knit in it. If the bag is very large, these plain knit rows are important so the bottom doesn’t become too narrow – leave them out as the decreases become less and less. If the bag is smaller, leave out the knit rows as you continue to decrease so it doesn’t get a cone shape. Leftover yarns can be used to make a nice bulls-eye pattern on the bottom. Switch to double-pointed needles when there are too few stitches for the round needle. At the end, *k2tog* until there are less than a dozen stitches remaining and pull thread through these stitches, pull tight and weave in the end.
Loops for strap:
Where green meets blue at top stripe, pick up 6 stitches and work an i-cord for about 4.5-5 inches. Pull the i-cord over in a loop to where the picked up stitches are and attach it to the bag by binding off together with the picked-up stitches: With your left-hand needle, pick up the first stitch (on the bag – where you started the i-cord), k2tog, pick up the next stitch, k2tog. On the right-hand needle, pull first stitch over the second, binding off. Continue picking up, k2tog and binding off until last stitch, cut thread and weave in end.
Evenly space your loops, adding as many as you like (4 is a good minimum for a large bag).
Strap:
Work an i-cord with 10 stitches, changing colors as you like and making it as long as you need. My felted strap is 49” – long enough for me to double and carry over my shoulder – so it could have been twice as long to start.
Before binding off, pull it through the loops on the bag, then knit together and bind off the stitches on your needle, together with the cast-on edge – creating a continuous strap.
Felting:
The bag was huge – a small child could’ve fit in it. It shrunk by at least 50%.
Very unscientific method – put in wash with jeans , hot water, detergent and a dash of baking soda and agitate 3 or 4 times. Check the size each time until it’s shrunken enough. Don’t let it go through a spin cycle – this seems to collect fuzz. When done, mold it over an appropriate shape. I covered a huge breadcrumb can with plastic bags and then pulled the bag over this. It took a few days to dry and then it was done!
 The stripes melded together nicely during felting and there should be no knit stitches visible – it’ll look like one piece of fabric. The loops can be made longer to accommodate a thicker strap - this is a fun bag to customize.


Beautiful bag!
ReplyDeleteThanks for this very interesting tutorial. Just discovered it via the 'special mentions' on whip up.
I like this! A friend wants me to make one for her, I'm about 30 rows in - so I'll share pics when I'm done!
ReplyDeleteWhat is the size of the bag after you felted it?
ReplyDeleteBag is approximately 6.25" across bottom and 11.5" tall. Thanks for looking!
ReplyDelete